Purchase orders (POs)
Purchase orders (POs)

What it is
“PO” means two completely different things in the PIM, so always be clear which one you mean:
- Supplier PO — we buy stock or materials from a supplier. This is the one that goes to Xero and gets emailed to the supplier.
- Client PO — a customer sends us their purchase order (their authorisation for us to invoice them).
flowchart LR
  S[Supplier PO: we buy] --> X[Push to Xero → supplier emailed]
  C[Client PO: customer buys] --> D[Creates Pipedrive deal(s)]
How to do a SUPPLIER PO (we’re buying)
- In the PIM dashboard, click New PO (or Upload Supplier PO to bring in an existing PDF).
- Choose the supplier, add the line items, set the account code and delivery address.
- Save — this creates the PO as a DRAFT (nothing has gone to the supplier yet).
- Open the PO and click Push to Xero and confirm.
- The PO is created in Xero as Authorised and the supplier is emailed automatically.
The New PO form is now usable on your phone — the columns stack and each line becomes its own card.
Step-by-step (illustrated)
-
On the Purchase Orders page, click Purchase Order to open the new-PO form.
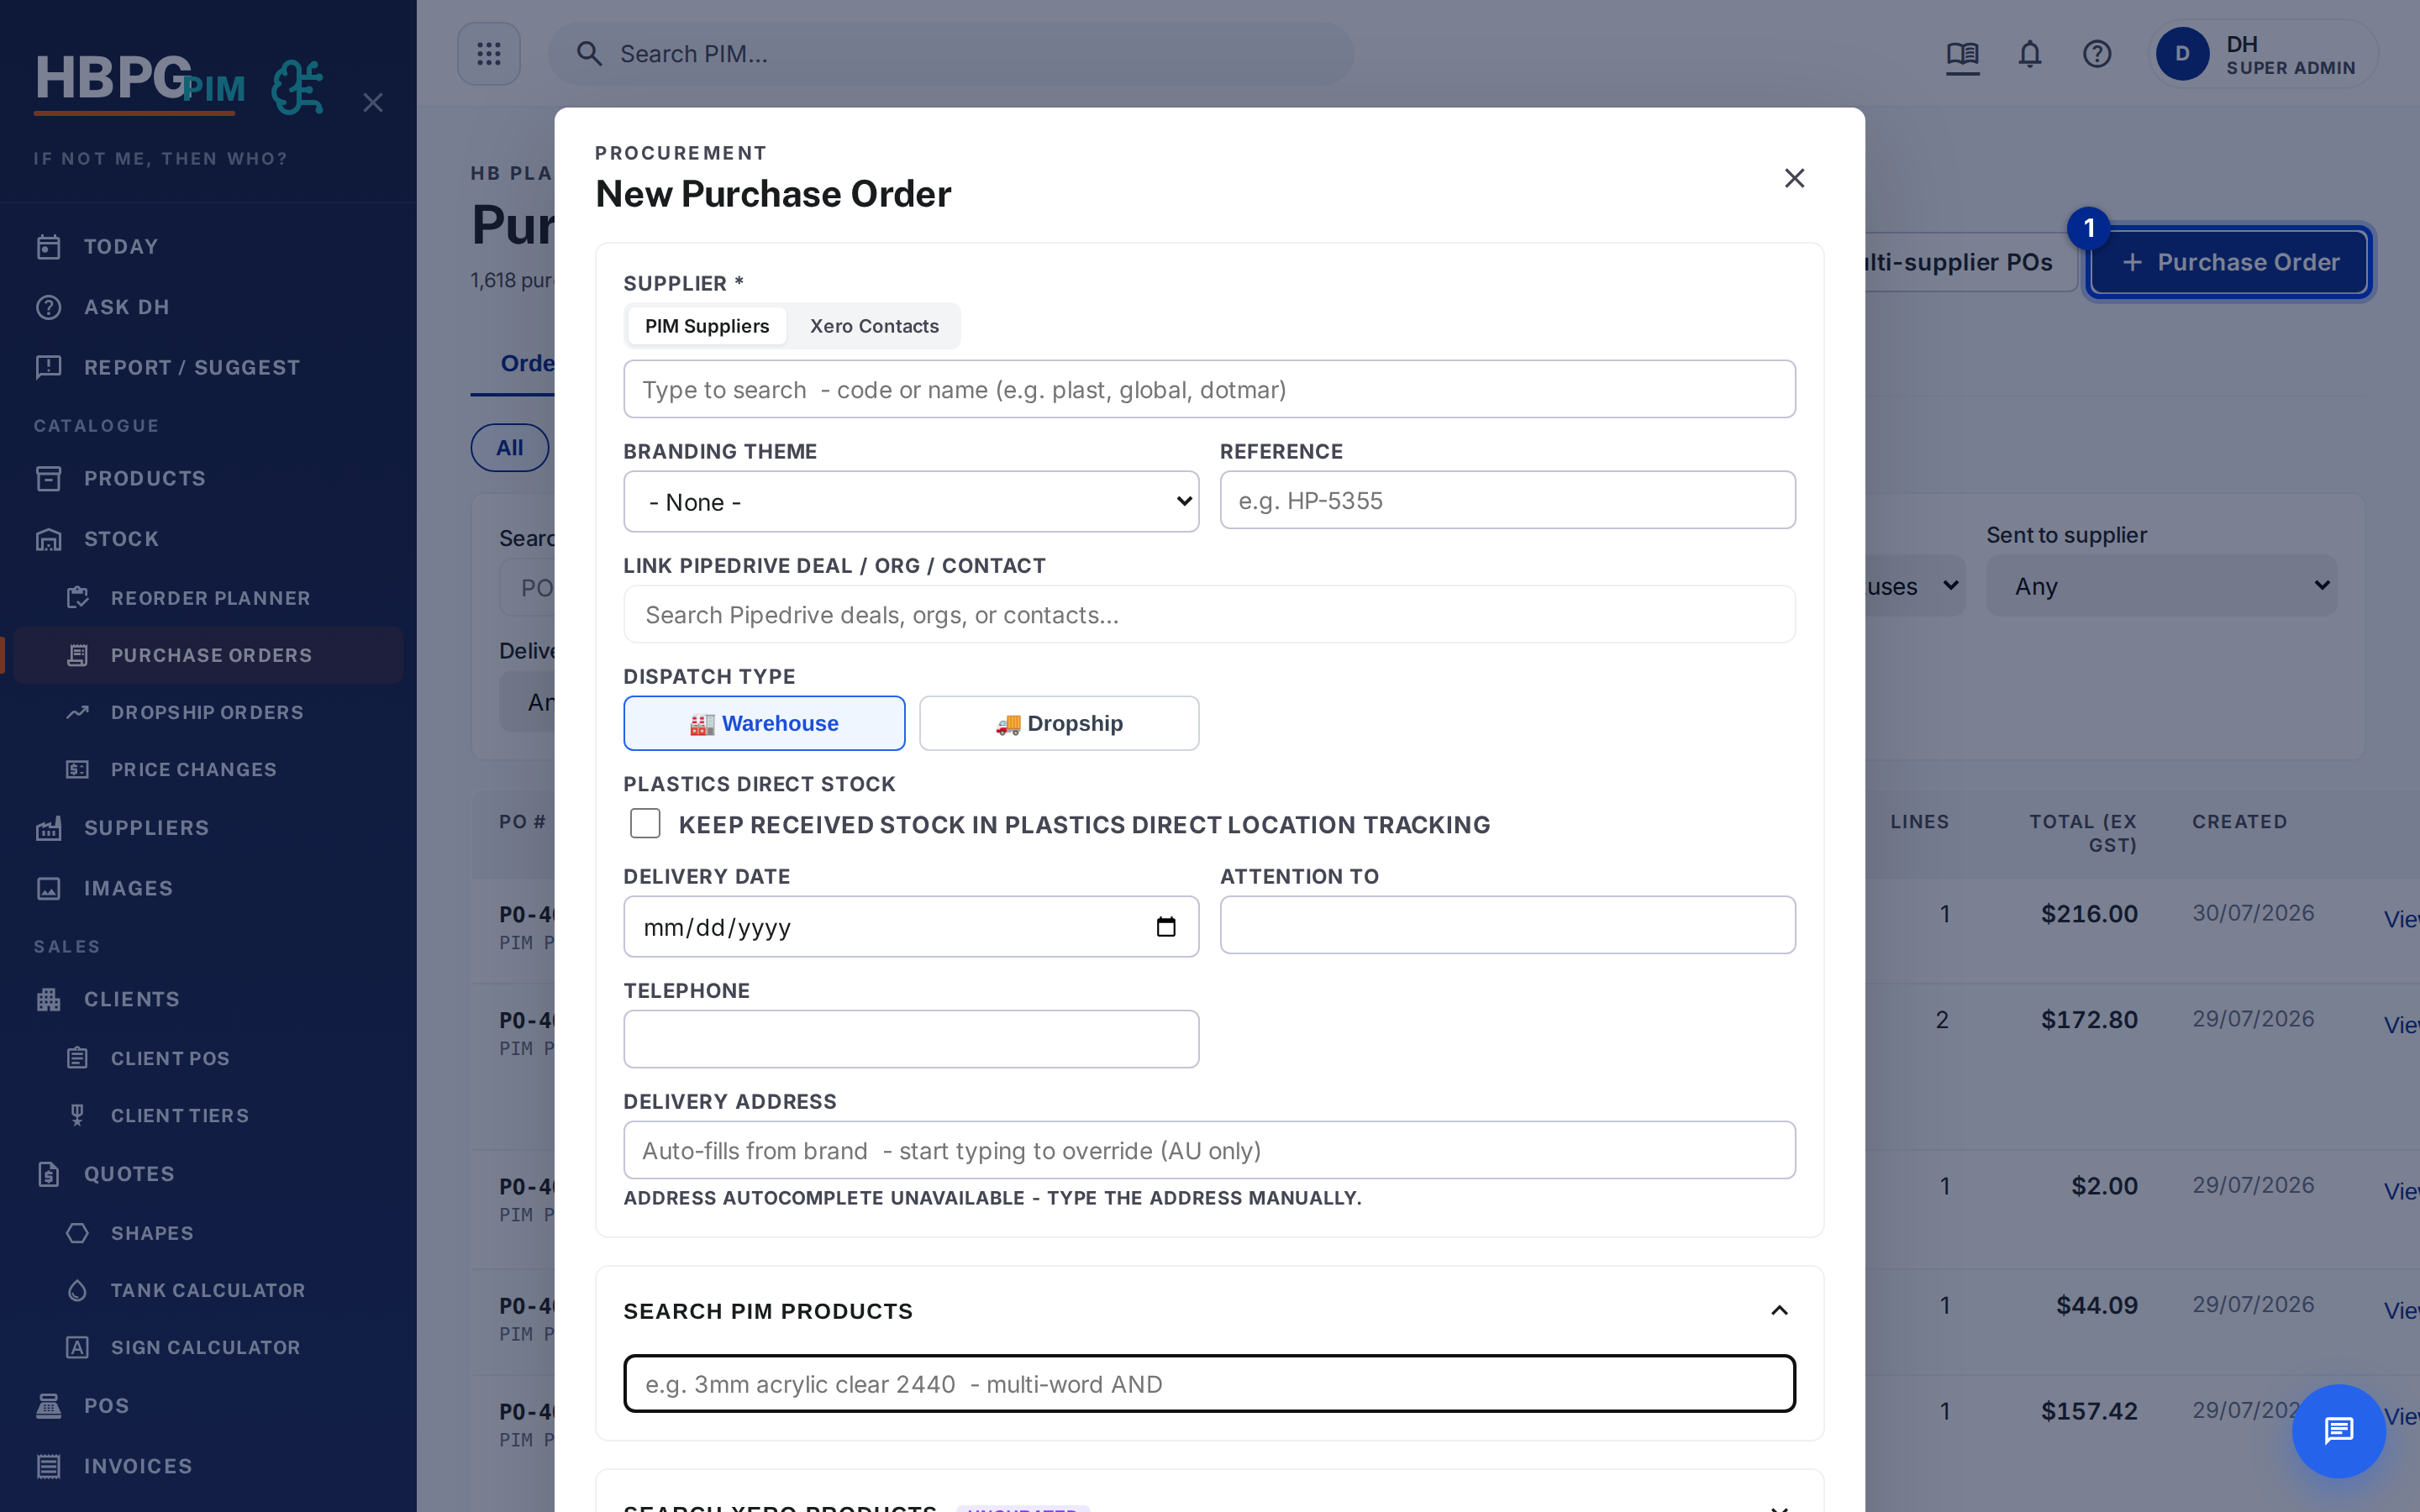
Step 1 — click Purchase Order to open the new-PO form -
Type the supplier name and pick it from the list.
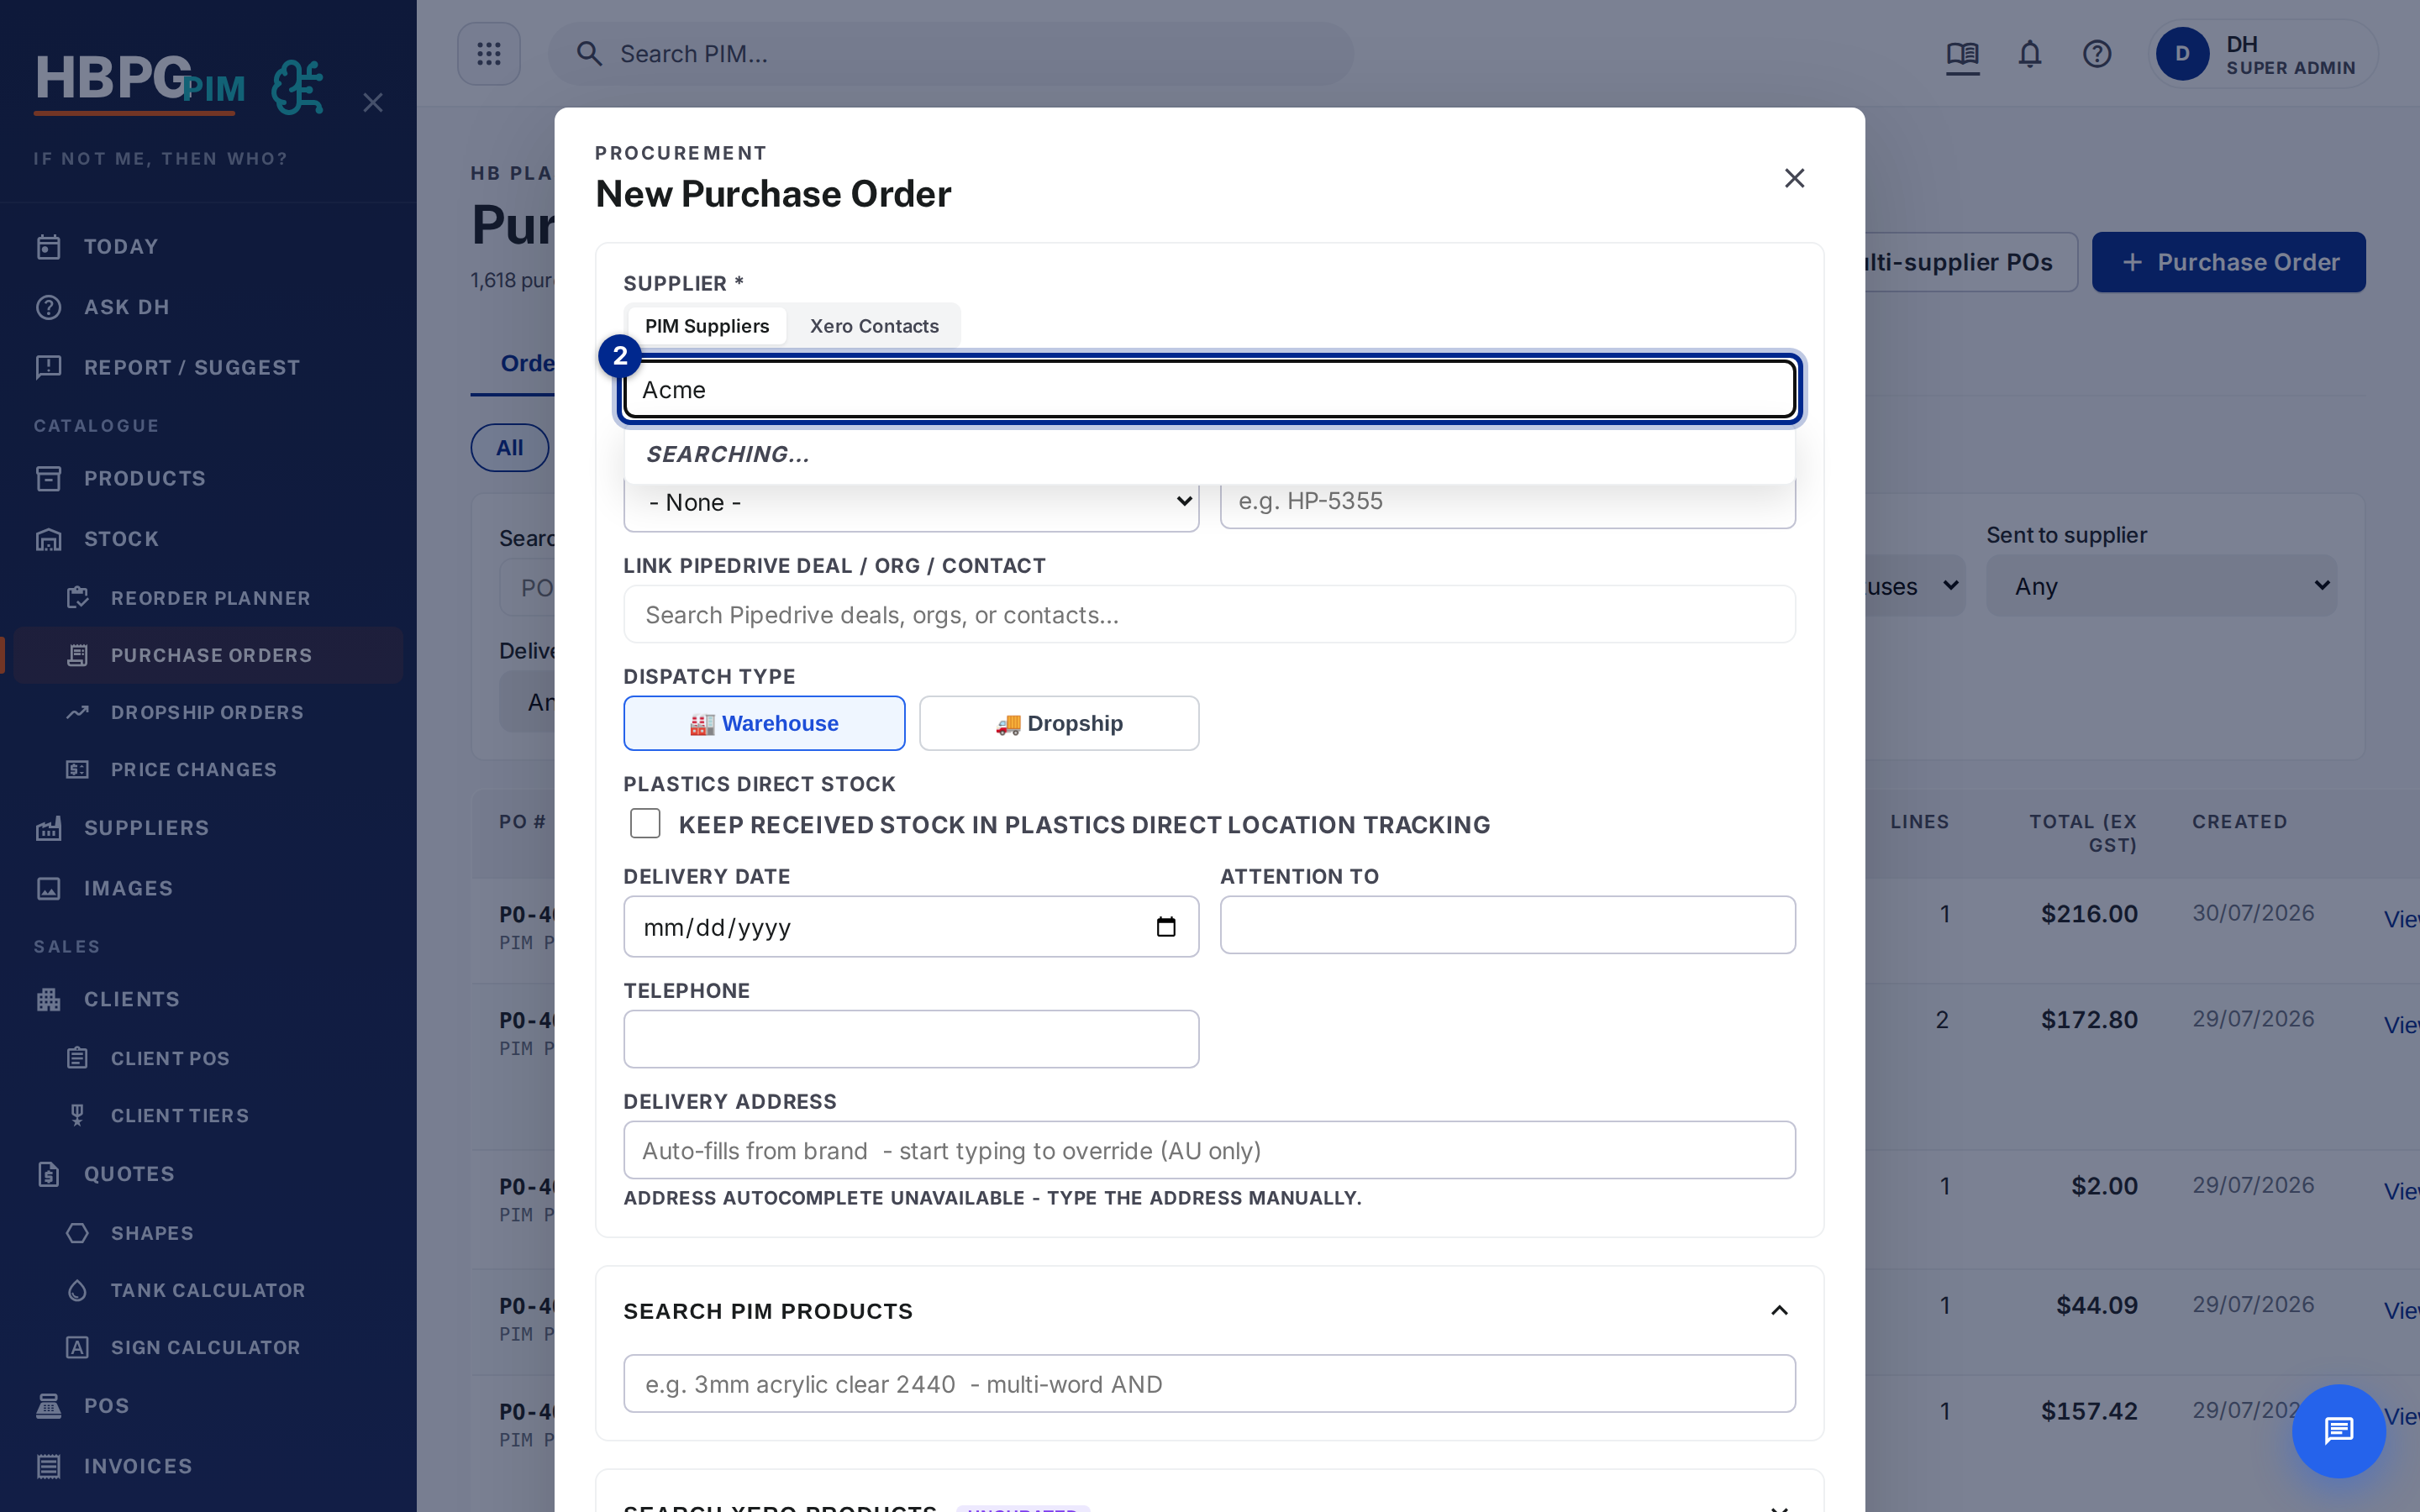
Step 2 — type the supplier name and choose it -
Add your line items (and an account code per line), then click Save Draft. Approve & Send is the one that pushes the PO to Xero and emails the supplier — use Save Draft while you’re still building it.
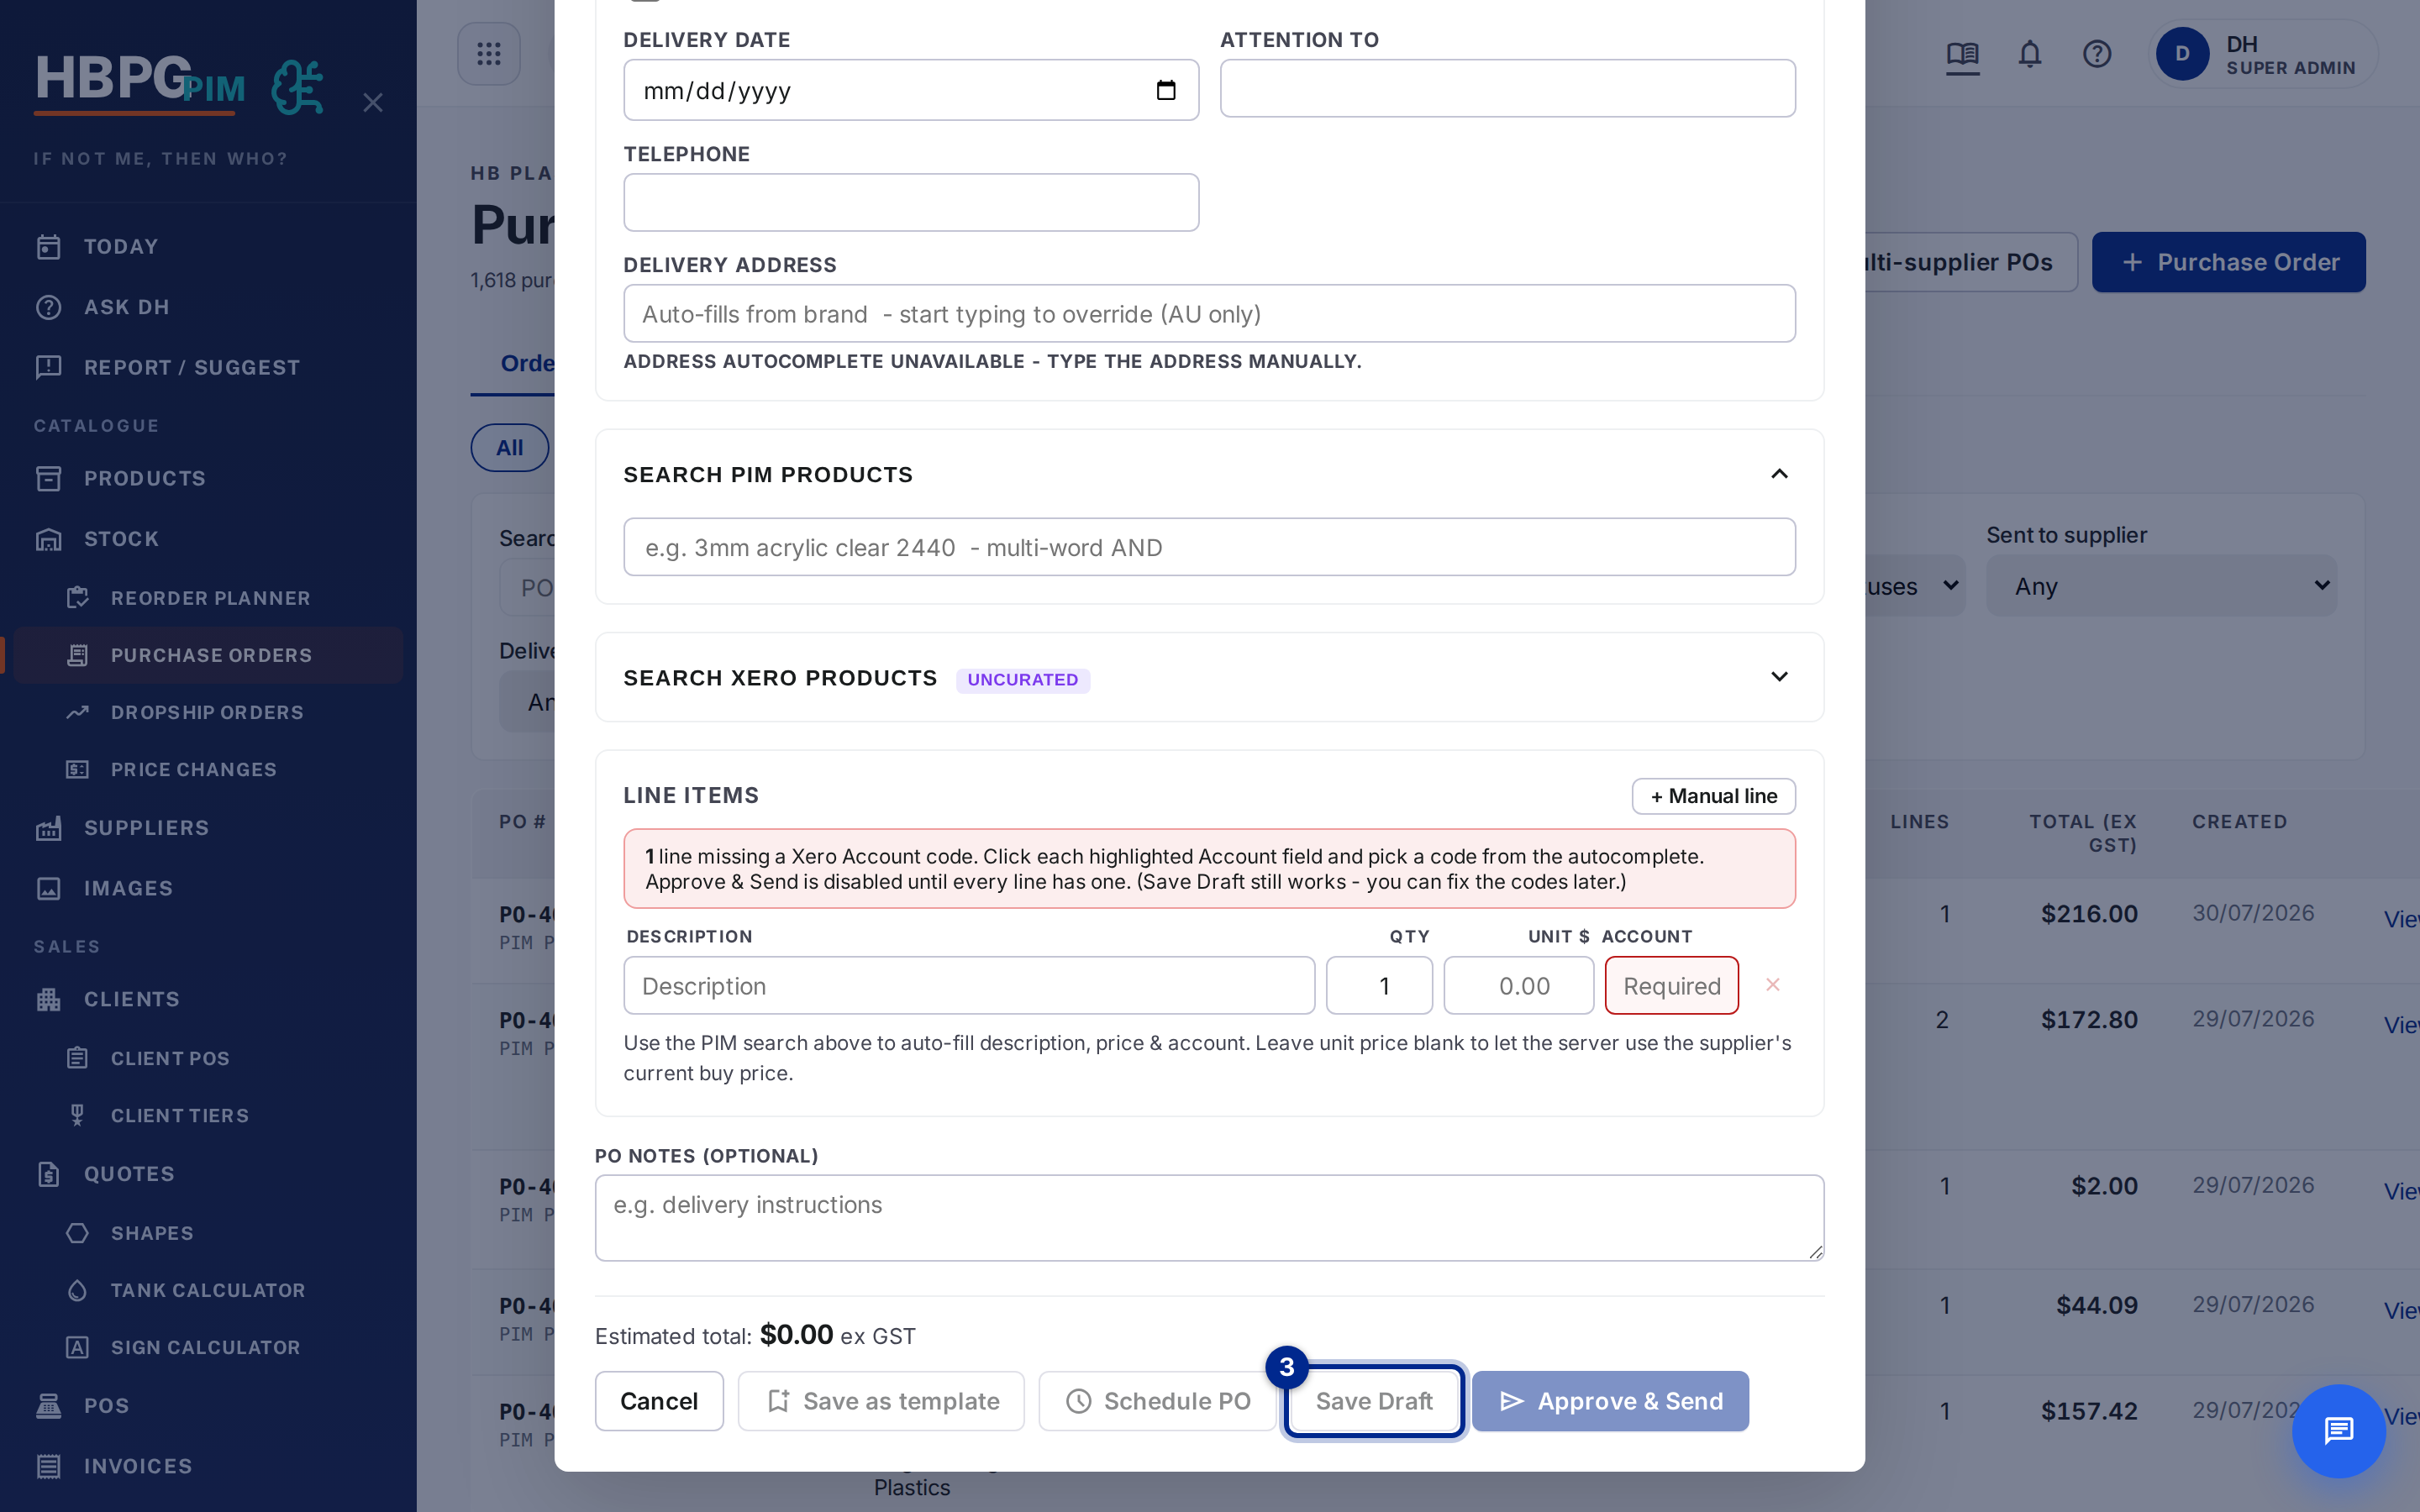
Step 3 — add line items, then Save Draft
If you search the supplier under the Xero Contacts tab and a matching PIM supplier already exists (by name or ABN), the form now asks “Link to existing <supplier>?” rather than quietly creating a second copy. Choose Link to reuse the supplier we already have, or Create new if it really is a new one. This stops duplicate suppliers building up.
Buying from several suppliers at once (Multi-supplier POs)
When one job needs materials from different suppliers, you don’t have to raise each PO by hand:
- On the Purchase Orders page, click Multi-supplier POs.
- Search and add the products you need (any mix of suppliers), set the quantity on each.
- Click Preview split — the system groups the products by supplier and shows you one PO per supplier before anything is sent.
- Check the split, then click Send all POs — each supplier gets its own PO, authorised in Xero and emailed, in one action.
Products that have no resolvable supplier are listed as skipped so you can chase them separately.
Preloading a PO to auto-send when the invoice is paid
You can build the supplier PO(s) for a job ahead of time and have them fire automatically the moment the customer’s invoice is paid — so no one has to remember to raise them after payment.
From the PIM New PO form: fill in the PO, click Schedule PO, and under When to fire choose “When invoice is paid”, then pick the deal’s invoice.
From the Xero worker deal panel: in the Create Purchase Order box, tick “Fire when this deal’s invoice is paid” instead of setting a date.
When that invoice is fully paid — by card, or by bank transfer/manual payment in Xero — the PO auto-authorises in Xero and emails the supplier. It fires once. Until it fires it sits in the Scheduled tab, where you can cancel it if the job changes.
There’s a known glitch: if you push several POs in a row, Chrome can show a “Don’t allow this page to create more dialogs” tickbox. If that gets ticked, every later push silently does nothing and the PO stays stuck in DRAFT. Reload the tab and push again.
When a web order is paid, the system can auto-create DRAFT dropship POs to the preferred supplier/nearest branch. These are not sent automatically — staff review and fire them.
Recording a delivery (the QR code on the PO)
Every PO PDF carries a QR code. When the goods land, scan it with your phone camera — it opens a one-page form:
- Your Name — pick yourself from the dropdown.
- Delivery Condition — Good, Partial (some items missing) or Damaged (needs checking).
- Notes — optional, e.g. “2 sheets scratched, left on rack B”.
- Mark as Delivered.
The page remembers you on that phone, so next time it pre-fills your name with a Change button if it guessed wrong.
Your factory’s names come up first — Holland staff on a Holland PO, Burleigh staff on a P&M or Perspex PO — but the other factory is still listed underneath. That’s deliberate: if a driver drops a Holland pallet at Burleigh, whoever actually took it can still record it.
The list is shared with the job-card scan pages and lives in one place, so a new starter (or a name spelt wrong) is a quick fix for Daniel — no deploy needed. Ask rather than signing in as someone else.
Between May and August 2026, Holland staff saw the Burleigh list instead of their own and couldn’t record a delivery at all. That’s fixed — if you still can’t see your name, it’s a genuinely missing name, so flag it.
How to do a CLIENT PO (customer is buying from us)
- In the PIM dashboard, click Upload Client PO (or New Client PO).
- Drop the customer’s PO PDF — the system auto-extracts the customer and line items.
- Review the extracted lines, then split into deal group(s) if needed (each group can have its own brand and due date).
- Save — this creates the Pipedrive deal(s) for the order.
The invoice for a client PO is raised later through the normal invoicing flow (see Invoicing).
Common questions
- My supplier PO is stuck in DRAFT. It hasn’t been pushed, or the push silently failed — reload the tab and click Push to Xero again.
- I pushed but the supplier says no email. Check the PO actually reached Authorised in Xero; if it’s still DRAFT, the push didn’t go through.
- Do I push a client PO to Xero? No — a client PO creates Pipedrive deals; the invoice comes later.
- A scheduled “fire on paid” PO didn’t send the instant I marked it paid. Card payments fire it right away; a bank-transfer/manual payment can take up to ~15 minutes to be picked up. It still fires — just give it a moment.
- I ticked “fire on paid” but need to stop it. Open the Scheduled tab and cancel (void) the PO before the invoice is paid.
Voiding a pushed PO is destructive and the supplier may already have been emailed. Don’t void without checking with Daniel.
Who to tell if it breaks
Tell Daniel or flag in #whats-new.
TODO: confirm the exact button labels/positions on the PO detail screen with a screenshot.
Derived from: the PIM PO logic (po-ops, client-po-ops) and the push-to-Xero fix plan. If this looks wrong, the source changed — update the source and re-generate, don’t just patch this page. See also Xero.